Note: I’ve done this pattern several times but no one else has so if you see any mistakes or have any questions please let me know. If you don’t wish to sign into WordPress to ask a question, you could ask me on my Twitter or Instagram. My account links are at the side of this page.
For this gnome I used worsted weight wool and a 4mm hook. Size will vary with different yarns and hooks sizes.
I used a bit of black embroidery thread for the eyes.
I would classify this as an easy to intermediate pattern.
Short forms used.
MC= magic circle (see this tutorial on YouTube)
sc = single chain
INC = a single chain increase done by crocheting two single chains in one stitch
DEC = invisible single chain decrease (see this tutorial on YouTube)
*to* = repeat the instructions inside the asterisks around.

Gnome Crochet Pattern
Gnome Body
1) 6sc in MC (6)
2) Increase in each stitch around (12)
3) *sc, inc* around (18)
4) *2sc, inc* around (24)
5) *3sc, inc* around (30)
6) sc in each stitch around (30)
7) sc in the back loops only in each stitch around (30)
If you prefer a smooth rounded body with no definition, sc around as normal instead of in back loops
8) *4sc, inc* around (36)
9-12) sc around (36)
13) *4sc, dec* around (30)
14) Sc around (30)
15) *3sc, dec* around (24)
16) Sc around
17) *2sc, dec* around (18)
18) Sc around (18)
Fill with beans/weight and stuffing (see note below)
Switch to face color using an invisible stitch
19) sc around (18)
20) *sc, dec* around (12)
21) Dec around (6)
Stuff firmly and finish off.
Note: To stuff, place a small amount of stuffing lining the inside. Place a small bag made from cut nylons or scrap material inside. Fill with dried beans (available at the grocery store). Sew off the top of bag and add more stuffing until full. Gnome will tip over if there are no weights/beans inside!
Gnome Nose (in same color as face color)
1) 4sc in MC (4)
2) Increase in each stitch around (8)
3-4) sc around (8)
Add a bit of stuffing if desired or use the end string from the magic circle to plump up the nose.
5) Dec around (4)
Finish off leaving a long enough piece of yarn for sewing.
Sew on right above the color change line.
Use embroidery thread to make eyes in whatever shape you find appealing
Gnome Beard in whatever color you prefer
Note: row count does not include turning chain
1) Chain 8, ch1 for the turn (8)
in 2nd stitch from hook
2) *Inc, sc* repeat until end of row, ch1 and turn (12)
3) *Inc, 2sc* repeat until end of row, ch1 and turn (16)
4) *Inc, 3sc* repeat until end of row, and turn (do not make a ch1) (20)
5) skip the first stitch, *3dc in the next stitch, skip the next stitch, slip stitch* repeat from * to * to end of row. This gives you a 5 scallop edge.
Finish off and leave enough yarn for sewing.
Beard will form a half circle with a half circle cut out in the top part which will fit under the nose. Place and sew. One side will be more textured than the other, use whichever side you prefer.
You could also instead make a beard with yarn bits as you would with doll hair or make braids or use faux fur or fuzzy yarn, etc. You could even alter the pattern above to use bobble stitches.
I made my gnome bald but you can add hair in whatever style or way you prefer.
There are a lot of YouTube videos on adding hair to yarn dolls that you can check out. Find something that suits your fancy or holiday and have fun with personalizing your gnome!
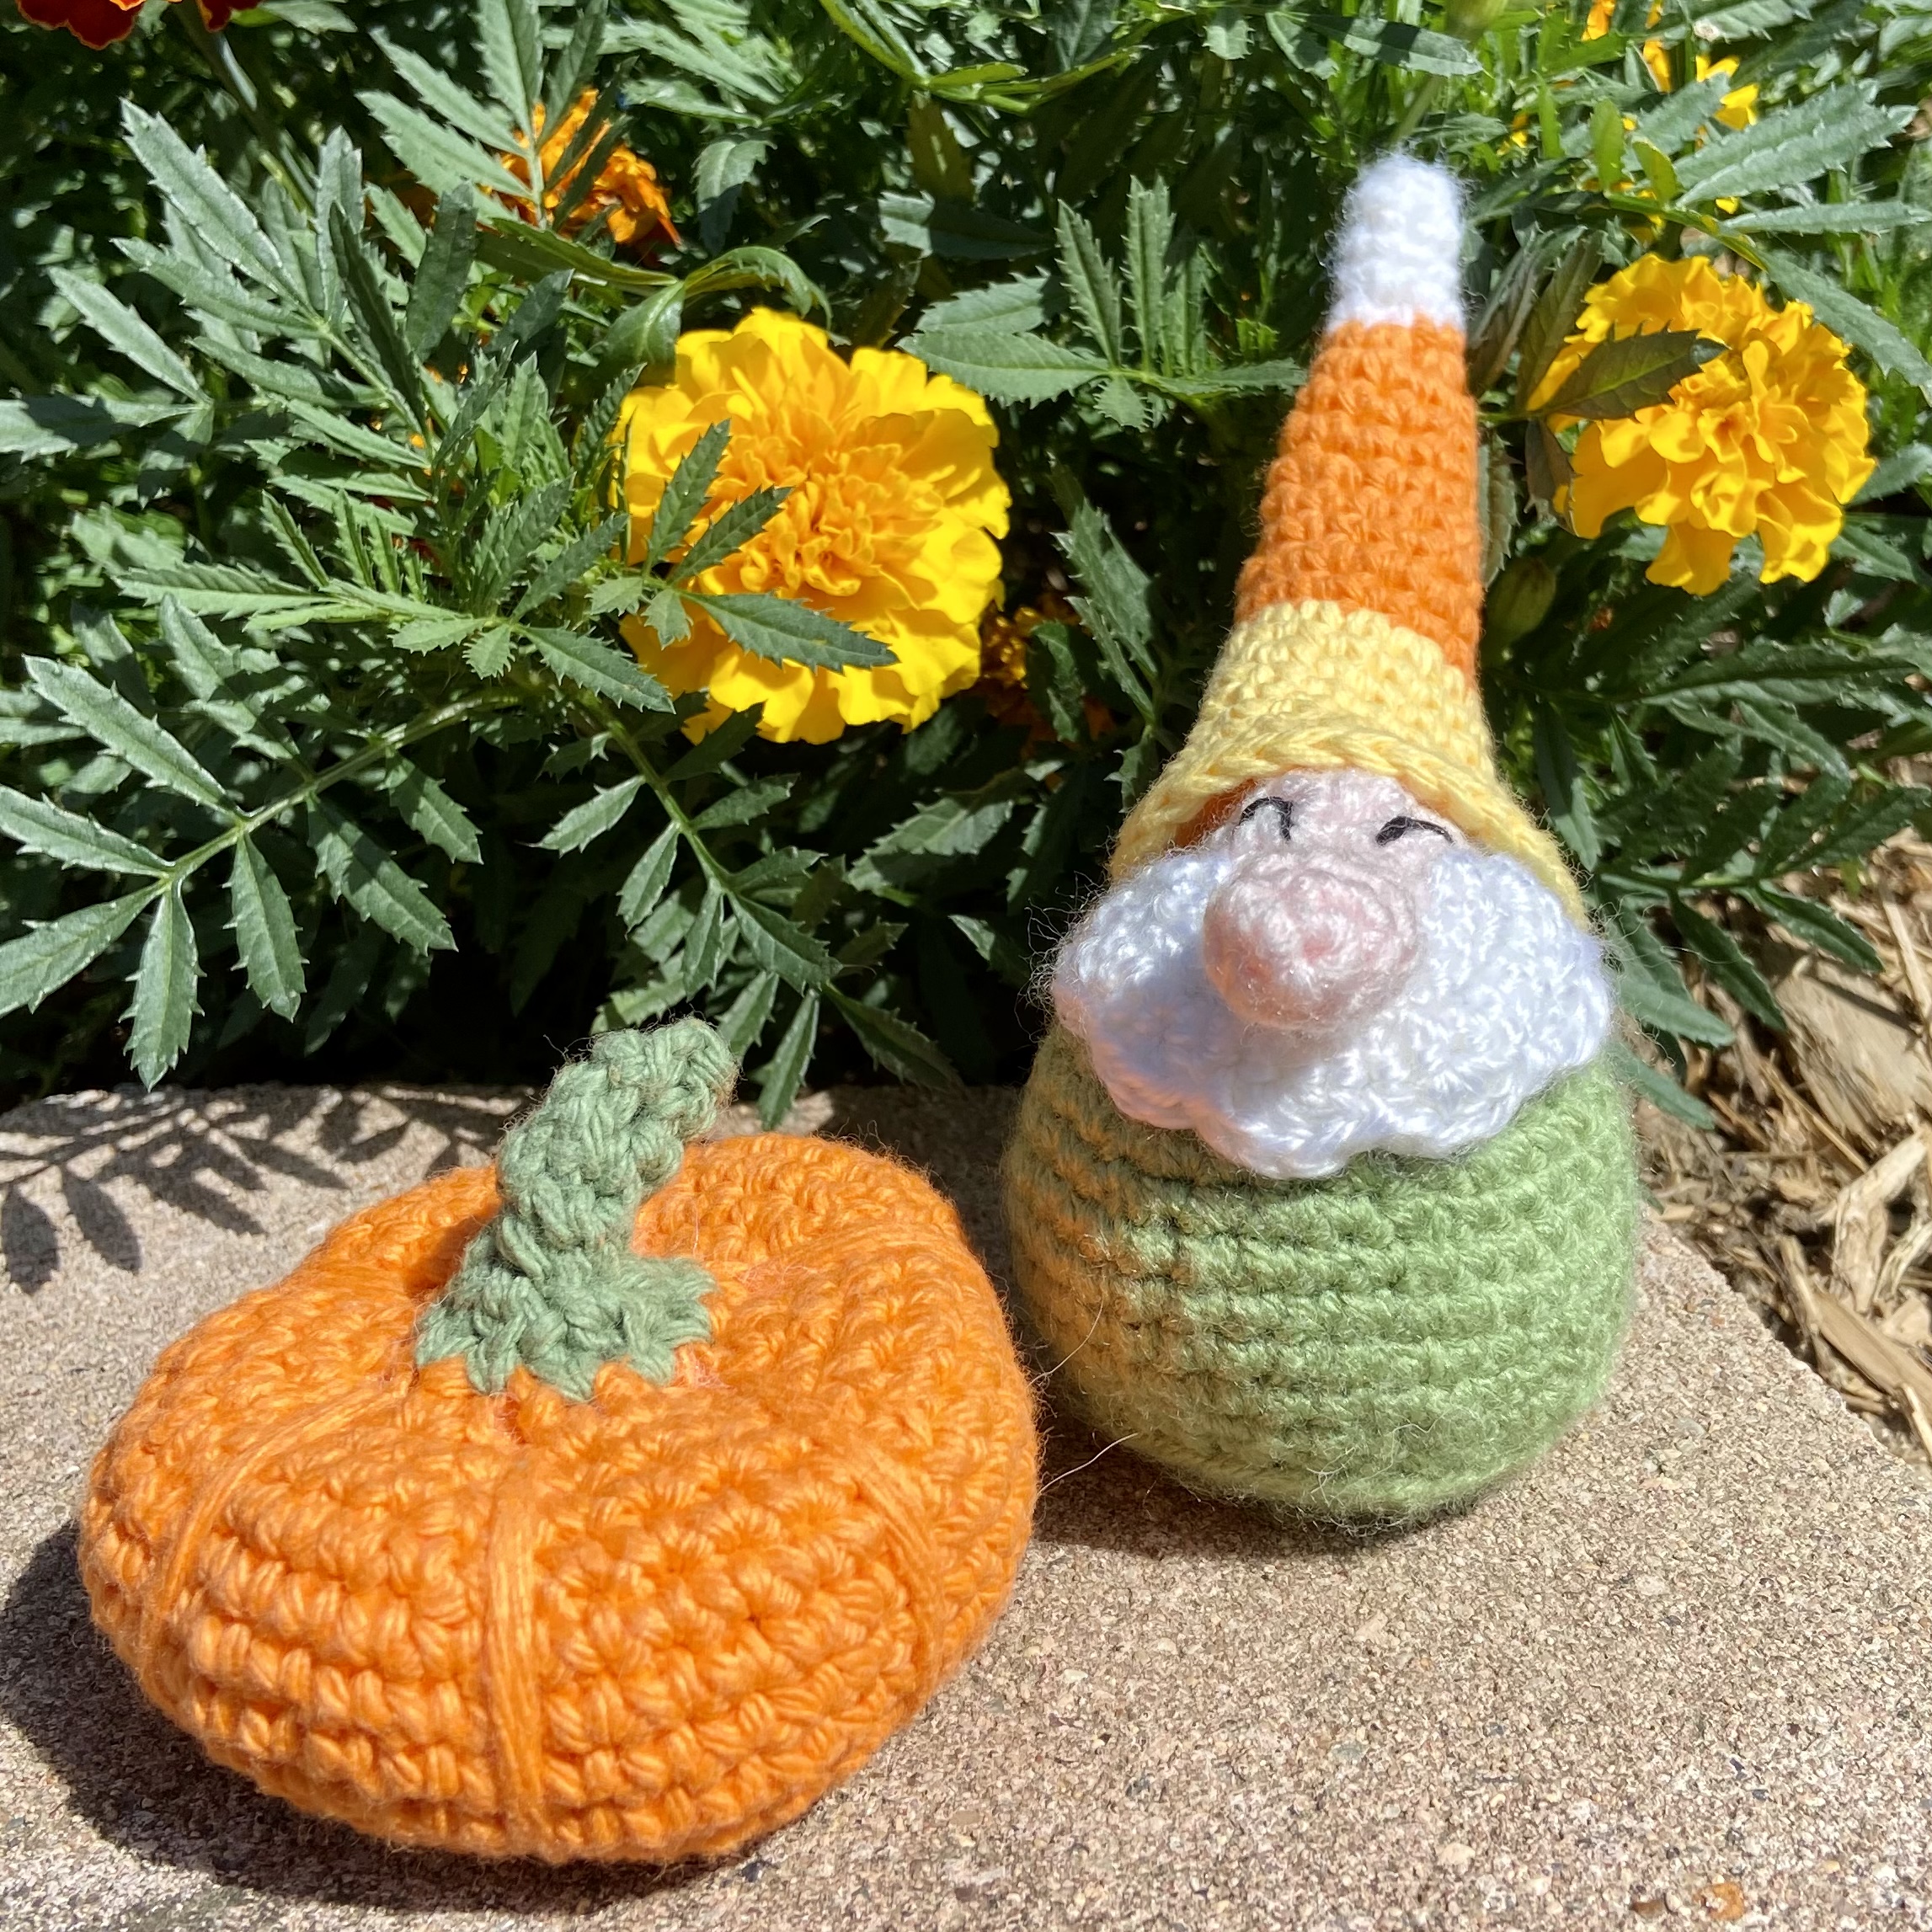
Gnome Hat
Do not stuff or gnome may tip over even with beans or weights inside the body.
(For candy corn hat start with white yarn)
1) 6sc in MC (6)
2-3) Sc in each stitch around (6)
4) Inc, 5sc (7)
5) sc around (7)
For candy corn hat only : switch color to orange
6) sc around (7)
7) Inc, 6sc (8)
8) Inc, 7sc (9)
9) sc around (9)
10) Inc, 8sc (10)
11) sc around (10)
12) 5sc, inc, 4sc (11)
13) sc around (11)
14) Inc, sc 10 (12)
15) sc around (12)
16) *inc, 3sc* repeat from * to * around (15)
17) sc around (15)
For candy corn hat only: switch color to yellow
18) *inc, 4sc* repeat from * to * around (18)
19)*inc, 5sc* repeat from * to * around (21)
20) *inc, 6sc* repeat from * to * around (24)
21) *inc, 7sc* repeat from * to * around (27)
22) *inc, 8sc* repeat from * to * around (30)
Leave a long string and finish off by sewing round in each stitch to make a nice edge.
Use snaps to attach to head. Sew the snaps on the head first where the ears would be. Then match up on the ones on the head and sew on.
By making a removable hat, you can interchange hats and change your gnome as you desire for various holidays and seasons.
You can decorate the hat with flowers or beads or personalize it anyway you’d like.
©Virginia Spencer, thepurpledogpaintingblog.com, 2022